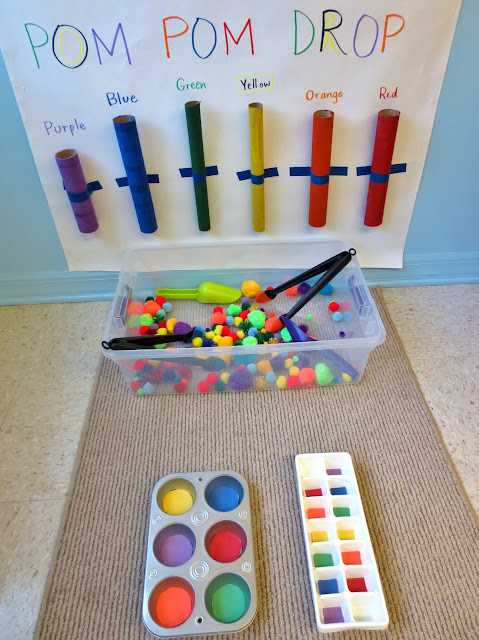
All year we’ve been having fun with colors, but these past few weeks we had a fun pom pom center! This included
a pompom drop and a place to sort the pompoms by color.
I came across some great ideas for pompom drops on Pinterest,
but this was just a quick throw-together. I would love to attach these to wood
instead of just paper!
Anyway, I began with cardboard tubes (I’m such a hoarder) and painted them 6 different colors using 2-3 coats of regular tempera paint. Then I attached them with painter’s tape to a large piece of paper and taped it all up to the wall.
Add a bin full of colored pompoms of different sizes, and we
had some happy toddlers!
They have gotten some practice pushing pompoms through small
areas like this, but they also got to experiment with different sized pompoms
and different sized tubes.
Some of the larger pompoms got stuck in the smaller tubes, so
we learned which sizes could fit down which tubes. (And we also had fun
stopping up the tubes and making piles of pompoms on top of them).
I drew their attention to the colors and showed them how the
tubes matched the pompoms in color – that they could drop a blue pompom down
the blue tube. A lot of them persisted in this activity, and others just
dropped the pompoms down whichever tube they liked, which was fine.
I narrated their actions to reinforce the color learning: “Susie
dropped an orange pompom down the green tube – look! It came out the bottom and
into the bin!”
As fun as the pompom drop was, they also had a blast just
playing with the pompoms. They are such a fun sensory experience – just try
squishing a big fat one between your fingers! You can see here scoops of
pompoms being tossed over the shoulder – it was glorious fun!
They also got to compare the texture of the smooth and soft
pompoms to the sparkly bristly ones. This little one took a handful to carry
around with her for the morning.
I also had tongs and scoops available to exercise finger muscles
in picking up the pompoms.
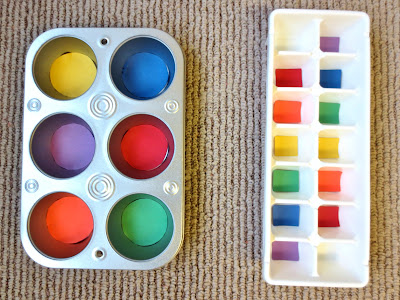
AND… we had a muffin tin and ice cube tray with some colored
paper taped to the compartments. Sometimes we put them in the matching colors,
and sometimes we didn’t.
In any case, we are practicing one-to-one correspondence and
using our fine motor skills in grasping the pompoms…
…and learning to share and work together!
As you can imagine, cardboard tubes taped to paper with
painter’s tape did not stay on the wall for long. But we found other uses for
them. This little blue pompom got hidden under the yellow tube – what a fun
game!
Like any sensory play, the room got a little messy, as in
pompoms were underfoot everywhere. But this was a very popular center with a
fun way to learn about and practice sorting colors.
Of course, use discretion with toddlers
and small objects like pompoms. These 23-29 month olds have gotten months of practice with small objects under my heavy supervision, and
they have past the mouthing stage. But of course, I still watched them to make
sure.
UPDATE on 3-20-13:
I am overwhelmed at the number of views this post has had in such a short time! First blogging success! :) Here's something that may make this activity a little more durable: when my coworker used this idea, she stapled her cardboard tubes to a poster board!
Thanks for stopping by!


I really like this idea! I have done the tube drop thing for our week on blue, but this takes it further! We are doing a review week for our colors starting next week. Hmmm...I wonder if I would be able to get enough tubes in that short amount of time? Thanks for sharing!
ReplyDeleteLeah @ simplehomeblessing.com
Haha, well if you lived close enough I would be glad to share some of my stash with you - I'm such a hoarder :)
DeleteThis is a cute activity! Looks like the kids really enjoyed it too. Thanks for sharing!
ReplyDeleteWhat a wonderful activity you prepared! The colors are so fun and inviting. Love this!
ReplyDeleteFabulous post! What a fun way to learn colors. We also love playing with pom poms here. :)
ReplyDeleteI love finding ways to teach colors to my son. He loves pompoms! Pinned it.
ReplyDeleteI would love it you would link up on our Artsy Play Wednesday kids' activity party. Opens at midnight Est each Wed at babygiveawaysgalore.com
This is a great idea for teaching colors, I'm sure my little ones would love it!
ReplyDeleteThis looks like so much fun!
ReplyDeleteFabulously simple and easy to implement. Thanks for such a great idea for the activity area of our Library
ReplyDeleteI took your idea!! thanks! but I changed the pom poms for balls of different diameter... This project was made for my Fieldwork II, I almost done with OTA program and I need an activity for different types of grasp. Thanks again, great idea.
ReplyDeletewhat types of tubes are these?? I have the board the pom poms now i just need tubes! thanks for sharing your great idea!
ReplyDeleteThey are just the leftover tubes from paper towel rolls! Teachers don't throw anything away :)
DeleteHi Kristen, what a gorgeous post and the kids looked like they were having so much fun! I look forward to checking our more on your blog.
ReplyDeleteWe have done something very similar http://www.learning4kids.net/2012/10/02/sorting-colours-with-cardboard-tubes/
Thank you! I enjoyed your post too and will enjoy seeing your future ideas as well!
DeleteI loved the way the children learn to problem solve.While having fun
ReplyDeleteWow! Great ideas. It looks like the kids really enjoyed learning this day. I love that pom poms are so durable!
ReplyDeleteI absolutely love this idea! I am in the process of making my own but instead of the tubes I have decided to use plastic so that they can see the pom poms inside. I'm sure I could have bought some clear plastic tubing but I decided to make my own tubes! All I did was use laminating sheets! I ran the laminating sheets through the laminator to get them stiff, cut them in half and rolled them to make a tube! I can't wait to be done and for the kids to use it! Thank you for the GREAT idea!
ReplyDeleteHow did you choose the color on the clear tubes
DeleteI love this for my little ones.
ReplyDeleteHow do i write an assessment on this